Building Your Own tvOS Application
Build your own Apple TV App
The new Apple TV could have huge implications for content producers everywhere. If the company that brought us the largest market place of apps anywhere is able to reproduce its success on TVOS, publishers should rejoice.
While we're interested in following the evolution of the platform, we focused our time with gaining a complete understanding of the developer kit and learning how to build apps. What we discovered left us truly impressed: gone are the days of every app being written in objective-c. Apple is now providing developers with a toolset that is familiar to most - javascript and xml. With this approach, it is possible to develop a powerful tv experiences with a common web stack. With that, instead of building our own MediaSilo Apple TV app, we chose to help you build yours.
Goody-bye Objective-C - almost
TVOs applications can be written in a common webstack with Java and XML.
The following sample code comes complete with a MediaSilo library for retrieving and playing video content from MediaSilo. If you are a MediaSilo user already, this mean in less than 30 minutes, you could publish you own screening room or media portal on Apple TV with your own media. If you are new to MediaSilo you can still run the example code which includes access to a sample demo account.
Let's jump in:
Apple is offering a new way to develop apps for the new Apple TV utilizing TVJS, TVXML, and TVMLKit. Let's explain what these abbreviations mean. TVJS is a set of JavaScript APIs for creating client-server apps using TVMLKit. TVML or Television Markup Language is used to create individual pages inside of a client-server app. The TVMLKit framework enables you to incorporate JavaScript and TVML files in your binary apps to create client-server apps.
You can download the entire project source code from GitHub here.
Requirements
- Xcode 7.1 or later
- Basic knowledge on Javascript
- MediaSilo account (sample credentials provided below)
MediaSilo Sandbox
Feel free to use this account for testing:
Hostname: tvos
Username: tvos_developer
Password: tvOSdev1
Getting Started
-
If you don’t have it already, you’ll need Xcode 7.1 or later to run this. You can download Xcode 7.1 at https://developer.apple.com/xcode/download/.
-
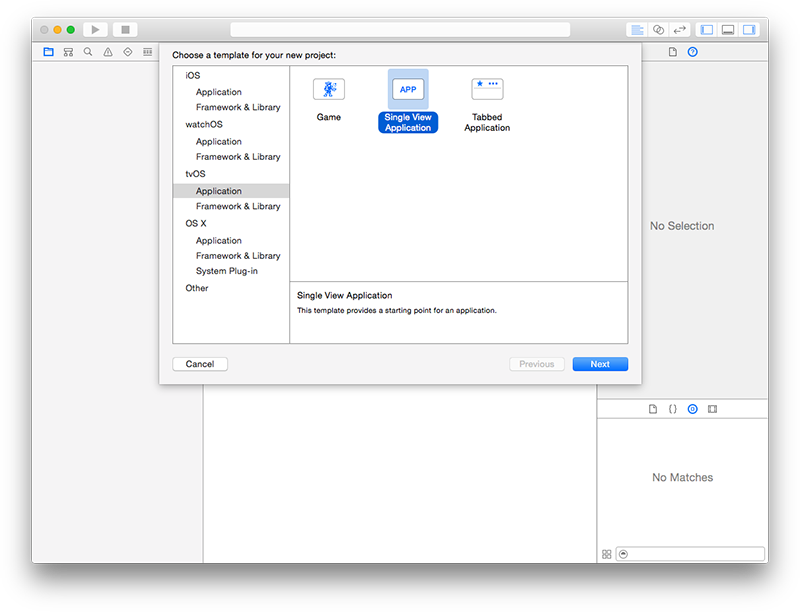
Open Xcode and create a new project using the Single View Application template from tvOS.

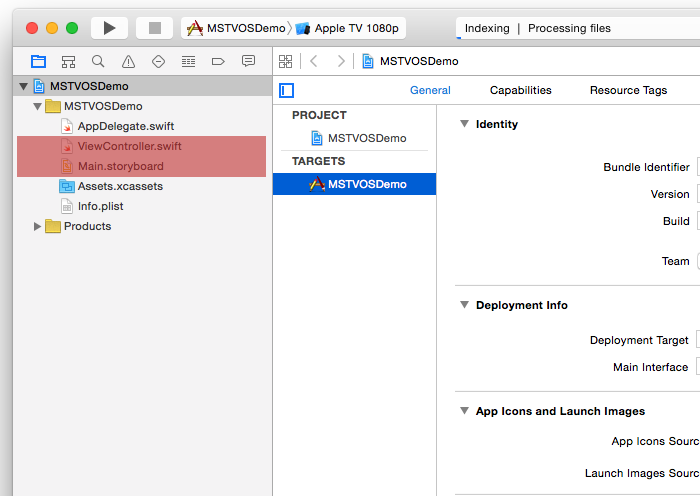
- Let’s simplify the template by removing the unneeded view controller file and the main storyboard from the app.

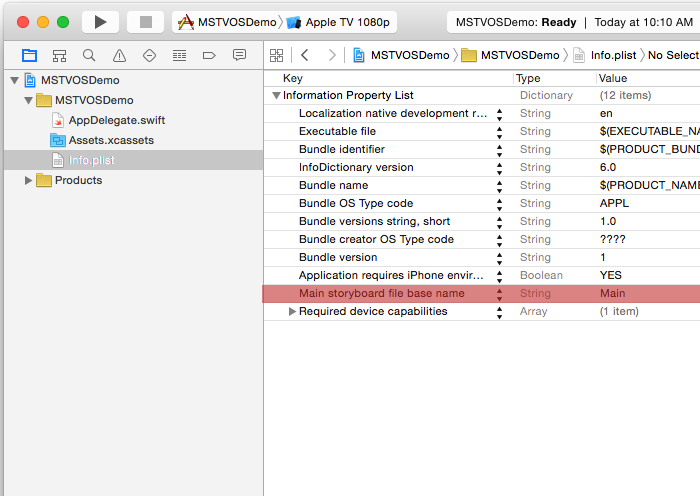
- Remove the Main storyboard file base name from info.plist.

- Let’s wire up our backend. In order to communicate with our front end we need TVMLKit so be sure to import it.
- In order to observe changes in our application state we’ll need to change the class declaration to add the
TVApplicationControllerDelegateprotocol. - We need to set up communication between our backend tvOS app and our javascript front end. To do that we’ll create a global variable
var appController: TVApplicationController? - Modify
application:didFinishLaunchingWithOptions:according to the code found in the listing below.
var window: UIWindow?
    var appController: TVApplicationController?

    func application(application: UIApplication, didFinishLaunchingWithOptions launchOptions: [NSObject: AnyObject]?) -> Bool {

        window = UIWindow(frame: UIScreen.mainScreen().bounds)

        let appControllerContext = TVApplicationControllerContext()

        let TVBaseURL = "http://localhost:9001/"
        let TVBootURL = "\(TVBaseURL)/application.js"

        if let javaScriptURL = NSURL(string: TVBootURL) {
            appControllerContext.javaScriptApplicationURL = javaScriptURL
        }

        appControllerContext.launchOptions["BASEURL"] = TVBaseURL

        if let launchOptions = launchOptions as? [String: AnyObject] {
            for (kind, value) in launchOptions {
                appControllerContext.launchOptions[kind] = value
            }
        }

        appController = TVApplicationController(context: appControllerContext, window: window, delegate: self)

        return true
    }
Now, let’s move to the client side of the application
- Create a new folder and name it “client” and add a new javascript file called “application.js”. For this tutorial we will use the stackTemplate to display a carousel and a shelf element. You can find the example template here.
var DemoAPP = (function () {

    var stackTemplate = function() {

        var XMLString = `<?xml version="1.0" encoding="UTF-8" ?>
        <document>
            <head>
                <style>
                .darkBackgroundColor {
                    background-color: #171717;
                }
                .titleBanner {
                    tv-text-style: title1;
                }
                .subtitleBanner {
                    tv-text-style: title3;
                }
            </style>
        </head>
            <stackTemplate theme="dark" class="darkBackgroundColor">
            <collectionList>
                <carousel>
                    <section>
                        <lockup>
                            <img src="https://s3.amazonaws.com/thumbnails.mediasilo.com/334450782SEKR/bc1f0cb2-7da8-498c-a368-4da05e1ed221_large.jpg" width="578" height="260" />
                            <title>Lorem Ipsum is simply dummy text of the printing and typesetting industry. Lorem Ipsum has been the industry's standard dummy text ever since the 1500s</title>
                        </lockup>
                    </section>
                </carousel>
                <shelf>
                    <header>
                        <title>Recent Assets</title>
                    </header>
                    <section>
                        <lockup>
                            <img src="https://s3.amazonaws.com/thumbnails.mediasilo.com/334450782SEKR/538b1dde-b73b-4d2c-b43f-5262c5243f25_large.jpg" width="578" height="260" />
                            <title>Asset Title</title>
                        </lockup>
                    </section>
                </shelf>
            </collectionList>
        </stackTemplate>
        </document>`

        var parser = new DOMParser();
        var domElement = parser.parseFromString(XMLString, "application/xml");
        navigationDocument.pushDocument(domElement);
    };

    return {

        stackTemplate:stackTemplate
    };

})();
- Now let's call the template inside of the loading method in application.js.
App.onLaunch = function(options) {

	DemoAPP.stackTemplate();
}
- Now we need to serve our client app. An easy way to do that is by using Python's SimpleHTTPServer. From the client directory run
python -m SimpleHTTPServer 9001.
This will run your client on http://localhost:9001. By reviewing the backend you’ll see that our tvOS server is already configured to find the front end here.
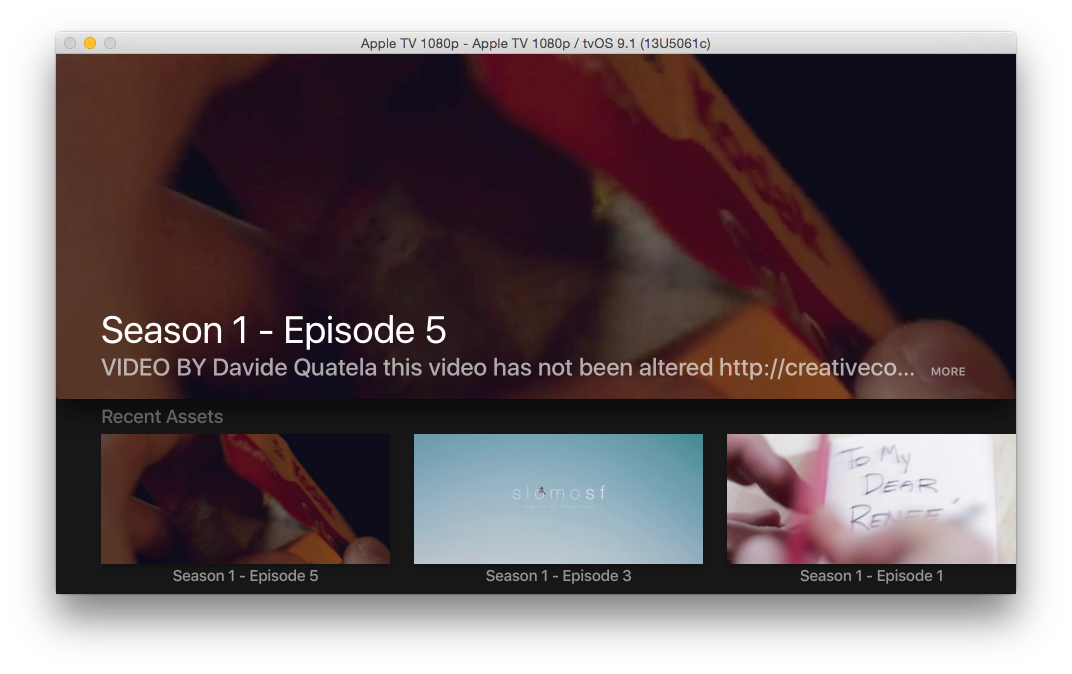
Go back to the Xcode and Run the app.

Now, let’s make the app fetch assets from your MediaSilo account.
4.First, in your application.js file add the following variables. We’ll use the to get our video assets from the MediaSilo REST API.
var appUrl; // base application url
var hostname = "tvos"; // Your MediaSilo hostname
var username = "tvos_developer"; // Your MediaSilo username
var password = "tvOSdev1"; // Your MediaSilo password
var projectName = "Season 1 - Final Cut"; // The project's name we will be using on this tutorial
var mediaSiloAPIUrl = "https://api.mediasilo.com/v3/"; // Since we're using the MediaSIlo API we'll store the root API url here
- Right below the stackTemplate method let's create a function to make the request to the MediaSilo API.
var apiRequest = function (apiurl, doneCallback) {

        var urlRequest = apiurl;
        var httpRequest = new XMLHttpRequest();
        httpRequest.onreadystatechange = function() {

            //We check to see if the request finished and response is ready
            if (httpRequest.readyState==4 && httpRequest.status==200) {

                var jsonData = JSON.parse(httpRequest.responseText);
                doneCallback( jsonData );
            }
        }
        httpRequest.open("GET", urlRequest, true);
        httpRequest.setRequestHeader("Authorization", "Basic " + btoa(username + ":" + password));
        httpRequest.setRequestHeader("MediaSiloHostContext", hostname);
        httpRequest.send();
    };
- Here we will create a method to retrieve all the projects you have access to. Since MediaSilo stores your video assets with projects we’ll need this before we can get them.
var fetchProjects = function (doneCallback) {

        apiRequest(mediaSiloAPIUrl + "projects", function(projects) {

            doneCallback(projects);

        });

    };
- Now that we have our projects, let’s create another method that we will use to fetch assets from a specific project.
var fetchAssets = function (projectId, doneCallback) {

        apiRequest(mediaSiloAPIUrl + "projects/" + projectId + "/assets", function (assets) {

            doneCallback(assets);

        });
    };
- Based on the list of assets that we have, let's dynamically generate the XML content that goes inside of the carousel.
var generateLockupCarousel = function (dataAssets) {

        var lockupXML = "";

        for (var i=0;i<dataAssets.length;i++) {

            var asset = dataAssets[i];

            lockupXML += '<lockup  videoURL="'+ getProxyURL(asset.derivatives) +'">'
                + '<img src="' + asset.posterFrame +'" width="1920" height="800" />'
                + '<overlay>'
                + ' <title class="titleBanner">'+ asset.title +'</title>'
                + ' <subtitle allowsZooming="true" class="subtitleBanner">'+ asset.description +'</subtitle>'
                + '</overlay>'
                + '</lockup>';

        }
        return lockupXML;
    };
- Let’s do the same for the shelf.
var generateLockupShelf = function (dataAssets) {

        var shelfXML = "";

        for (var i=0;i<dataAssets.length;i++) {

            var asset = dataAssets[i];
            shelfXML = shelfXML + '<lockup asset="' + asset.id + '" videoURL="'+ getProxyURL(asset.derivatives) +'">'
                + '<img src="' + asset.posterFrame +'" width="578" height="260" />'
                + ' <title>'+ asset.title +'</title>'
                + '</lockup>';

        }
        return shelfXML;
    };
- Here is the method we are using to display video asset.
var playVideo = function( event ) {

        var ele = event.target,
            videoURL = ele.getAttribute("videoURL");

        if(videoURL) {

            var player = new Player();
            var playlist = new Playlist();
            var mediaItem = new MediaItem("video", videoURL);

            player.playlist = playlist;
            player.playlist.push(mediaItem);
            player.present();
        }
    }
- We can now pass in our carousel and shelf to our stackTemplate so it can build itself dynamically. Also add an event listener on the domElement to respond when a video is selected to display it.
var stackTemplate = function(carousel, shelf) {

        var XMLString = `<?xml version="1.0" encoding="UTF-8" ?>
        <document>
            <head>
                <style>
                .darkBackgroundColor {
                    background-color: #171717;
                }
                .titleBanner {
                    tv-text-style: title1;
                }
                .subtitleBanner {
                    tv-text-style: title3;
                }
            </style>
        </head>
            <stackTemplate theme="dark" class="darkBackgroundColor">
            <collectionList>
                <carousel>
                    <section>
                        ${carousel}
                    </section>
                </carousel>
                <shelf>
                    <header>
                        <title>Recent Assets</title>
                    </header>
                    <section>
                        ${shelf}
                    </section>
                </shelf>
            </collectionList>
        </stackTemplate>
        </document>`

        var parser = new DOMParser();
        var domElement = parser.parseFromString(XMLString, "application/xml");
        domElement.addEventListener("select", DemoAPP.playVideo.bind(this), false);
        navigationDocument.pushDocument(domElement);
    };
- Let’s go back to the method App.onLaunch and make some changes to it. First, let's call the the method that we just created, fetchProjects. This loops through the results and finds the project name we defined in the variable projectName. After that we will fetch all the assets on this project.
App.onLaunch = function(options) {

    DemoAPP.fetchProjects(function(projects) {

        for (var i = 0; i < projects.length; i++) {

            var project = projects[i];

            if (project.name == projectName) {

                DemoAPP.fetchAssets(project.id, function(assets) {

                    var xmlCarousel = DemoAPP.generateLockupCarousel(assets);
                    var xmlShelf = DemoAPP.generateLockupShelf(assets);

                    DemoAPP.stackTemplate(xmlCarousel, xmlShelf);

                });
            }
        }
    });

}
Changelog
